My First Quilt quilted on my New Bernina Q24

0

I finished my first quilt on my new Bernina Q 24 and have entered it in QuiltCon 2017!  This is actually my first quilt submitted to a show.  I’m keeping my fingers crossed that it will be juried in.   Drunkard’s Bullseye WOW! is an enlarged version (58×58″) of one of the blocks I designed on EQ7 for the Modern Quilts Unlimited/Michael Miller Fabrics “Everything Old is New Again” (#OldisNewMQU) block and quilt challenge.drunkards-bulls-eye-1800-p-300-ppi-copy-2

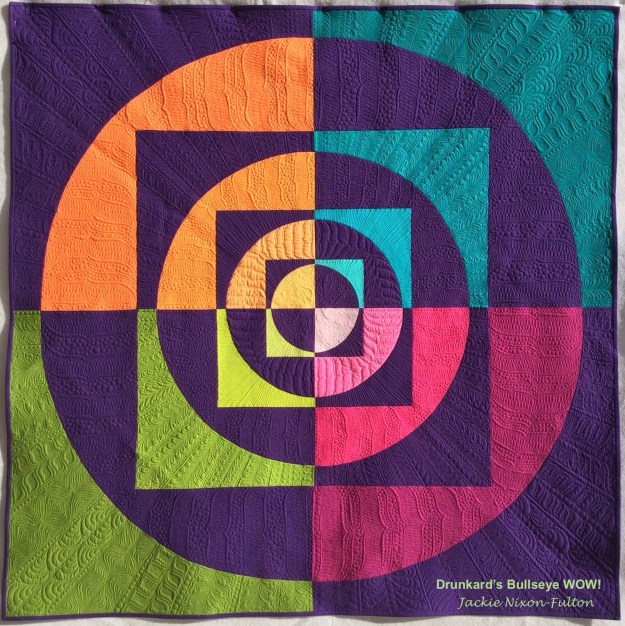
I have to say that I really LOVE this new machine.  Even though it was new to me, it made things so much easier.  I did do some practice pieces prior to loading the quilt top.  I tried a variety of thread combinations and played with the top tension….Oh, yeah!  You can digitally adjust the top tension!  No turning a tension dial and hoping it is approximately where you want it.  Did I say, I LOVE my Suzi Q?  (BTW, you are supposed to name your machine, so I dubbed mine Suzi Q because the tag that came with the machine said she was made by a woman in Switzerland named Suzi.)   There are so many things I love about this machine….I love the digital display showing the different programs, plus I can set a specific program for the thread and tension that I am using, along with specifying SPI and BSR.   While I was working,  I could easily go from manual (doing small circles), to BSR 2 for doing ruler work, and then BSR 1 stitch regulated mode and automatically it would bring up the speed I had been using.  This may not make all that much sense to you, but compared to my  A-1, the Bernina Q24 is  like  Lamborghini and  my A-1 was a VW Beetle.

I also loved that I can sew from right  to left and from left to right and from botton right to top left and no thread breakage!   And I was using Superior’s So Fine thread.

I’m not sure what I love the most, but I love that the stitch regulator is truly a stitch regulator!  There are sensors on the foot plate on either side of the needle that determine how fast the fabric is moving and it adjusts the speed so that the length of the stitches stay consitent and  are truly accurate.  The quality and consistency of the stitches in BSR 1 and BSR2 is absolutely amazing.

Another thing I love is that threading the machine is done at the front  and there is a great built-in bobbin winder at the front.  You can easily exchange hopping feet.  They just pop on.  You use regular sewing machine needles which is nice…no special order.  Oh, and the lighting is great.  I’m sure I’m forgetting something, but I will keep you updated on my progress with Suzi Q.

Next week we install the computer…another adventure and learning curve begin!

Save

Final Blocks of the Modern Quilts Unlimited Mag/Michael Miller Fabrics Block Challenge!

8


With the last few blocks to do, the challenge was to  design blocks that would complement the patterns and colors of the other 9 blocks and create a harmonious and cohesive quilt.   The final quilt challenge will determine whether I succeeded in this task.  The quilts will be posted by Nov 15th and voting will go from Nov 16th -30th.

June’s block was Drunkard’s Path (below left).   This traditional block is simply a quarter of a  circle set within a square.  There are many, many ways that these can be set to make a block or quilt.  As you can see in my modern version (below right), Drunkard’s Bull’s Eye, there are numerous drunkard’s path subunits  in each quarter circle gradually enlarging from the center outward with alternating light and dark.  The light colored fabrics were graded from light to darker as you moved from the center outward  which gives it incredible depth and a luminous quality.  It just seems to jump out at you  while at the same time it recedes into the distance.  This was my favorite block of the 12, and  I can see a large one-block quilt in my future!

The final block of the challenge was Jacob’s ladder.

JacobsLadderBlock

This block when put together in a quilt, can create some beautiful secondary patterns.  Just search Pinterest for Jacob’s ladder quilts and you will see a beautiful mix of traditional and modern takes on this classic block.


I played around quite a bit with this one, and below are several drafts of potential blocks designed in EQ7.

But in the end, I decided to make it a little simpler than the original and give it the look of an actual ladder.  I reversed the colors on either side of the ladder and I love the contrast.   The turquoise,  purple, and orange also complement two of the other blocks…Sailing the Chevron Sea and ZigZag BowTie.  My version of Jacob’s ladder won the last block challenge.

Contemporary Jacob's ladder

I had one last block to create.  I wasn’t able to do the rail fence block during the month it was featured, so I had a chance to design a block to balance the colors and pattern of my Spiral Pinwheel block.  The “Rail Fence in a Rail Fence” does a great job of complementing the pinwheel block, and I was very happy with the result.  What do you think?

Rail Fence in a Rail Fence                          Spiral Pinwheel

TaDa!  Below are my twelve blocks!


Ironically, I thought the due date was Sept 10th, so I was frantically working to get it finished. For the last few months of the challenge I was already playing around with  the layout on my graphics program, and was doodling with the the quilting motifs for each block on my iPad.  That sped things up a lot.   The piece was on the frame and I was quilting it when I checked the site to see if anyone had already posted a finished quilt and low and behold, found that it was not due until Nov 15th!  I was so relieved!  I had to go to Maryland to help my daughter haul two horses to North Carolina, so I had plenty of time after my trip to finish it.   I’m super happy with it and can’t wait for the big reveal in November.    Here is a sneak peek of some of the quilting:

Stay tuned for voting Nov 16th to Nov 30th to vote in the final Quilt Challenge!

Creating the Lemoyne Star Pinwheel

0

Lemoyne Star is the block for this month’s Modern Quilts Unlimited/Michael Miller block challenge. This was particularly challenging as I had an episode of sciatica this past month. Wow! I cannot imagine having that much pain and spasm long term! It really put the skids on my normal energizer bunny life style.  Anyway, I am much better now!  I came up with a design early on that I called “Faceted Lemoyne star”, but there were so many tiny pieces and I just didn’t think I was up to that.   I had plenty of time to lay around and daydream, so I redesigned the block on EQ7 and came up with “Lemoyne Star Pinwheel”. It is a really beautiful simple block. I love the 3D effect and the luminosity of the fabrics against the dark background.

Faceted Lemoyne StarLemoyne pinwheel unsigned copy


So next came construction. I thought I would try using Ruth B. McDowell’s technique. I recently got a couple of books by Ruth B. McDowell…her “Piecing Workshop” and her “Design Workshop” in order to expand my piecing skills to do more complicated blocks. It is paper piecing with a twist. Freezer paper is used as templates and you don’t sew through the paper. The finished product is not a mirror image of the pattern as with traditional paper piecing. After designing my block on EQ7, I decided to try her technique to put this block together.  With all the marking you do it actually turned out to be more accurate than regular paper piecing.

On the left is the 12″ block printed onto regular paper and taped together.  Then you trace the block onto the shiny side of freezer paper with a sharpie (below right).  The outside  perimeter is marked with a highlighter to  orient your sides to straight of grain.

Lemoyne pinwheel full size pattern copy

Paper template for auditioning fabric

freezer paper traced block copy

Traced design on shiny side of freezer pape


Then you turn the freezer paper over and with a pencil trace the pattern, outline each section with a colored pencil, label each piece and note the color of fabric, etc, and make markings to line up pieces and mark intersections (below).

close up of section with markings

Sections labeled and intersections marked

Next the freezer paper sections are cut out and ironed onto the back side of the corresponding fabric.  Using a rotary cutter and a ruler, cut out each piece adding 1/4″ all around (below left). For the pieces on the exterior edges, line the straight of grain up with the highlighted outside edge. This ensures that you do not have bias on the outside of edges of the block.  For the outside edges, I added at least 1/2″ seam allowance to ensure that when the blocks are squared up I have enough fabric (Sometimes, even I am not perfect!) to make the blocks a perfect 12.5″.

freezer paper on fabric with 1:4" seam added

1/4″ seam allowance added

IMG_4075

Add extra seam allowance outside edges


You can audition the fabrics by placing the pieces on the front side of the original paper template  (Below left).  Next, the subunits are joined matching the marks.  In this case D1 to D2. (Below right).  Sewing just to the edge of the freezer paper.  Then adding D3.

IMG_4083

Matching the marks on the seam lines.

IMG_4076

Auditioning the fabric


IMG_4091

Sewing adjacent to the freezer paper

IMG_4136

Adding D3 to the sewn D1/D2 piece


IMG_4138

Finished subunit. Reverse.

IMG_4137

Finished subunit


Finished subunit D1/D2/D3 is shown above with seams pressed open.

My background squares and triangles were added using Gylene Fitzgerald’s Y-seam “butterfly” method.  All the points matched very well, if I do say so myself!

IMG_3957

Added background square and perfectly matched points


Voila!  The finished block!

Lemoyne pinwheel unsigned copy

By the way, this block did win the block challenge!