Chicago, Here We Come!

2

I am very excited to announce that both quilts I submitted were juried into the special exhibit “A Celebration of Color” which is debuting at the International Quilt Festival in Chicago in April!  The quilts are “Playing Well Together” which I made for the Modern Quilts Unlimited magazine/Michael Miller fabric #mquOldisNew block and quilt challenge, and “Drunkard’s Bullseye WOW!” which was derived from one of the blocks from the #mquOldisNew challenge.    Take that QuiltCon!

This was such uplifting news as I am recovering from head trauma that I sustained the first week of January when I was bucked off of my young mare. Fortunately I was wearing a helmet, or I probably wouldn’t be able to write this at all.  I’m slowly recovering.  For someone who is normally an energizer bunny, this has been difficult.  I have been able to do some limited sewing and quilt designing, but find that I get really fatigued after an hour of concentration.  I am hoping that I will be able to make the trip to Chicago in early April and see if one will get a  ribbon.  But regardless, it is such an honor to have not only one but two  quilts chosen for such a prestigious show!

“Playing Well Together” is Michael Miller Fabrics Choice for the #OldisNewMQU Challenge

2

playing-well-together-signed

I am so honored to have my quilt chosen as the winner of the Michael Miller Fabrics Choice Award! This was my very first challenge in which to participate, and it has been such an amazing creative adventure. I challenged myself to learn something new or try a new technique with each block. I became proficient at designing blocks on EQ7 and designing my layout and auditioning quilting for the blocks using my computer graphics program.  I would recommend everyone push their creative envelope by participating in challenges. You never know what you can do until you try!  Thank you to  Michael Miller Fabrics, to Modern Quilts Unlimited magazine for organizing the challenge, and thank you to the other sponsors: Superior Threads(I used Superior’s So Fine, Bottom Line, and Monopoly), Babylock, and Mountain Mist batting. I also want to congratulate all the other participants for making some very creative blocks and quilts! 


My First Quilt quilted on my New Bernina Q24

0

I finished my first quilt on my new Bernina Q 24 and have entered it in QuiltCon 2017!  This is actually my first quilt submitted to a show.  I’m keeping my fingers crossed that it will be juried in.   Drunkard’s Bullseye WOW! is an enlarged version (58×58″) of one of the blocks I designed on EQ7 for the Modern Quilts Unlimited/Michael Miller Fabrics “Everything Old is New Again” (#OldisNewMQU) block and quilt challenge.drunkards-bulls-eye-1800-p-300-ppi-copy-2

I have to say that I really LOVE this new machine.  Even though it was new to me, it made things so much easier.  I did do some practice pieces prior to loading the quilt top.  I tried a variety of thread combinations and played with the top tension….Oh, yeah!  You can digitally adjust the top tension!  No turning a tension dial and hoping it is approximately where you want it.  Did I say, I LOVE my Suzi Q?  (BTW, you are supposed to name your machine, so I dubbed mine Suzi Q because the tag that came with the machine said she was made by a woman in Switzerland named Suzi.)   There are so many things I love about this machine….I love the digital display showing the different programs, plus I can set a specific program for the thread and tension that I am using, along with specifying SPI and BSR.   While I was working,  I could easily go from manual (doing small circles), to BSR 2 for doing ruler work, and then BSR 1 stitch regulated mode and automatically it would bring up the speed I had been using.  This may not make all that much sense to you, but compared to my  A-1, the Bernina Q24 is  like  Lamborghini and  my A-1 was a VW Beetle.

I also loved that I can sew from right  to left and from left to right and from botton right to top left and no thread breakage!   And I was using Superior’s So Fine thread.

I’m not sure what I love the most, but I love that the stitch regulator is truly a stitch regulator!  There are sensors on the foot plate on either side of the needle that determine how fast the fabric is moving and it adjusts the speed so that the length of the stitches stay consitent and  are truly accurate.  The quality and consistency of the stitches in BSR 1 and BSR2 is absolutely amazing.

Another thing I love is that threading the machine is done at the front  and there is a great built-in bobbin winder at the front.  You can easily exchange hopping feet.  They just pop on.  You use regular sewing machine needles which is nice…no special order.  Oh, and the lighting is great.  I’m sure I’m forgetting something, but I will keep you updated on my progress with Suzi Q.

Next week we install the computer…another adventure and learning curve begin!

Save

Playing Well Together

0

img_0921

17 months ago I started participating in The Modern Quilts Unlimited Magazine/Michael Miller Fabric “Old is New” block challenge.  This has been such an amazing growth experience for me with regard to developing my creative side as well as my technical abilities.  Each month we were presented with a traditional block and had to come up with a more modern “new” version, and in the end put them all together in a quilt.   I played with many variations of setting the blocks using my graphics program trying to come up with a version that maximized negative space.  When I thought of staggering them on point and looked at how the piecing would be, I realized I could create an optical illusion of depth by using three shades of green.

I had a blast quilting it…and quilt it, I did!  For months I had been auditioning quilting designs on the blocks again using my graphics program, so for almost all of the blocks, I knew what I was going to do.  I used three variations of circles and lines in the staggered sashing, and really like the Yin and Yang circle on the last sashing.

I used Superior threads monopoly in clear or So Fine, and Bottom Line in  the bobbin.  The batting was Hobbs 80/20 topped with Hobbs Tuscany collection cotton/wool blend.  Size was 60 x 60″, the max size.

I’m concerned that for the final quilt competition, this might not be considered “modern enough” by the Modern Quilt Police.  But in the end, I love it!  This is what I would consider “modern traditionalism”.  What do you think?

I named this quilt “Playing Well Together” (which is a bit of a political statement considering the current political climate) in that even though the blocks are all very diverse, the group works well together.

Voting starts today and goes through Nov 30th.  Click on this link to go to the voting site.  Scroll down the page past “rules” and check out all the really beautiful quilts.  Click on the VOTE box next to your favorite (hopefully mine!).  https://www.facebook.com/sharer/sharer.php?u=http%3A%2F%2Fa.pgtb.me%2FMfCtTr%2Fh5Cj1%3Fw%3D36927840%26e%3D140583845

Have a Happy Thanksgiving!  And let’s all Play Well Together.

Save

Final Blocks of the Modern Quilts Unlimited Mag/Michael Miller Fabrics Block Challenge!

8


With the last few blocks to do, the challenge was to  design blocks that would complement the patterns and colors of the other 9 blocks and create a harmonious and cohesive quilt.   The final quilt challenge will determine whether I succeeded in this task.  The quilts will be posted by Nov 15th and voting will go from Nov 16th -30th.

June’s block was Drunkard’s Path (below left).   This traditional block is simply a quarter of a  circle set within a square.  There are many, many ways that these can be set to make a block or quilt.  As you can see in my modern version (below right), Drunkard’s Bull’s Eye, there are numerous drunkard’s path subunits  in each quarter circle gradually enlarging from the center outward with alternating light and dark.  The light colored fabrics were graded from light to darker as you moved from the center outward  which gives it incredible depth and a luminous quality.  It just seems to jump out at you  while at the same time it recedes into the distance.  This was my favorite block of the 12, and  I can see a large one-block quilt in my future!

The final block of the challenge was Jacob’s ladder.

JacobsLadderBlock

This block when put together in a quilt, can create some beautiful secondary patterns.  Just search Pinterest for Jacob’s ladder quilts and you will see a beautiful mix of traditional and modern takes on this classic block.


I played around quite a bit with this one, and below are several drafts of potential blocks designed in EQ7.

But in the end, I decided to make it a little simpler than the original and give it the look of an actual ladder.  I reversed the colors on either side of the ladder and I love the contrast.   The turquoise,  purple, and orange also complement two of the other blocks…Sailing the Chevron Sea and ZigZag BowTie.  My version of Jacob’s ladder won the last block challenge.

Contemporary Jacob's ladder

I had one last block to create.  I wasn’t able to do the rail fence block during the month it was featured, so I had a chance to design a block to balance the colors and pattern of my Spiral Pinwheel block.  The “Rail Fence in a Rail Fence” does a great job of complementing the pinwheel block, and I was very happy with the result.  What do you think?

Rail Fence in a Rail Fence                          Spiral Pinwheel

TaDa!  Below are my twelve blocks!


Ironically, I thought the due date was Sept 10th, so I was frantically working to get it finished. For the last few months of the challenge I was already playing around with  the layout on my graphics program, and was doodling with the the quilting motifs for each block on my iPad.  That sped things up a lot.   The piece was on the frame and I was quilting it when I checked the site to see if anyone had already posted a finished quilt and low and behold, found that it was not due until Nov 15th!  I was so relieved!  I had to go to Maryland to help my daughter haul two horses to North Carolina, so I had plenty of time after my trip to finish it.   I’m super happy with it and can’t wait for the big reveal in November.    Here is a sneak peek of some of the quilting:

Stay tuned for voting Nov 16th to Nov 30th to vote in the final Quilt Challenge!

Creating the Lemoyne Star Pinwheel

0

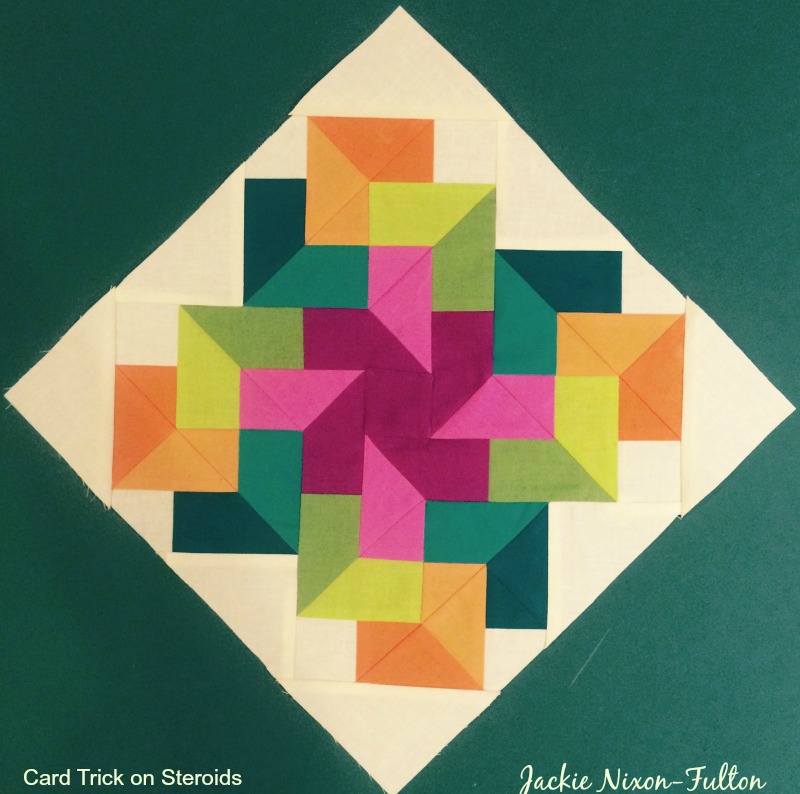
Lemoyne Star is the block for this month’s Modern Quilts Unlimited/Michael Miller block challenge. This was particularly challenging as I had an episode of sciatica this past month. Wow! I cannot imagine having that much pain and spasm long term! It really put the skids on my normal energizer bunny life style.  Anyway, I am much better now!  I came up with a design early on that I called “Faceted Lemoyne star”, but there were so many tiny pieces and I just didn’t think I was up to that.   I had plenty of time to lay around and daydream, so I redesigned the block on EQ7 and came up with “Lemoyne Star Pinwheel”. It is a really beautiful simple block. I love the 3D effect and the luminosity of the fabrics against the dark background.

Faceted Lemoyne StarLemoyne pinwheel unsigned copy


So next came construction. I thought I would try using Ruth B. McDowell’s technique. I recently got a couple of books by Ruth B. McDowell…her “Piecing Workshop” and her “Design Workshop” in order to expand my piecing skills to do more complicated blocks. It is paper piecing with a twist. Freezer paper is used as templates and you don’t sew through the paper. The finished product is not a mirror image of the pattern as with traditional paper piecing. After designing my block on EQ7, I decided to try her technique to put this block together.  With all the marking you do it actually turned out to be more accurate than regular paper piecing.

On the left is the 12″ block printed onto regular paper and taped together.  Then you trace the block onto the shiny side of freezer paper with a sharpie (below right).  The outside  perimeter is marked with a highlighter to  orient your sides to straight of grain.

Lemoyne pinwheel full size pattern copy

Paper template for auditioning fabric

freezer paper traced block copy

Traced design on shiny side of freezer pape


Then you turn the freezer paper over and with a pencil trace the pattern, outline each section with a colored pencil, label each piece and note the color of fabric, etc, and make markings to line up pieces and mark intersections (below).

close up of section with markings

Sections labeled and intersections marked

Next the freezer paper sections are cut out and ironed onto the back side of the corresponding fabric.  Using a rotary cutter and a ruler, cut out each piece adding 1/4″ all around (below left). For the pieces on the exterior edges, line the straight of grain up with the highlighted outside edge. This ensures that you do not have bias on the outside of edges of the block.  For the outside edges, I added at least 1/2″ seam allowance to ensure that when the blocks are squared up I have enough fabric (Sometimes, even I am not perfect!) to make the blocks a perfect 12.5″.

freezer paper on fabric with 1:4" seam added

1/4″ seam allowance added

IMG_4075

Add extra seam allowance outside edges


You can audition the fabrics by placing the pieces on the front side of the original paper template  (Below left).  Next, the subunits are joined matching the marks.  In this case D1 to D2. (Below right).  Sewing just to the edge of the freezer paper.  Then adding D3.

IMG_4083

Matching the marks on the seam lines.

IMG_4076

Auditioning the fabric


IMG_4091

Sewing adjacent to the freezer paper

IMG_4136

Adding D3 to the sewn D1/D2 piece


IMG_4138

Finished subunit. Reverse.

IMG_4137

Finished subunit


Finished subunit D1/D2/D3 is shown above with seams pressed open.

My background squares and triangles were added using Gylene Fitzgerald’s Y-seam “butterfly” method.  All the points matched very well, if I do say so myself!

IMG_3957

Added background square and perfectly matched points


Voila!  The finished block!

Lemoyne pinwheel unsigned copy

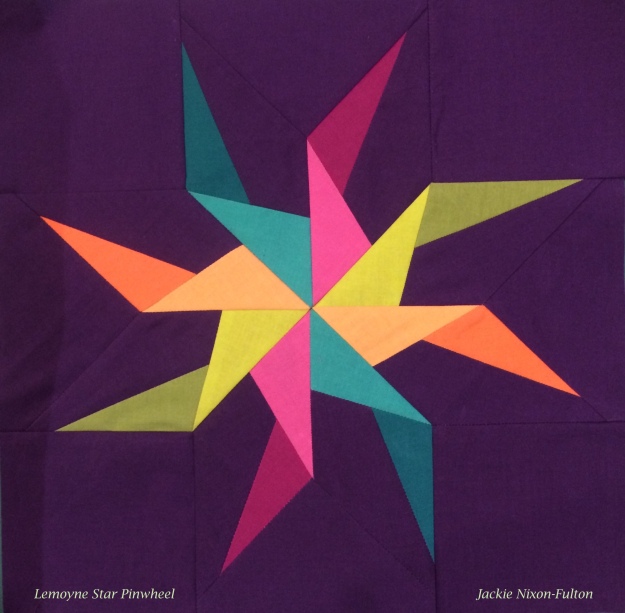
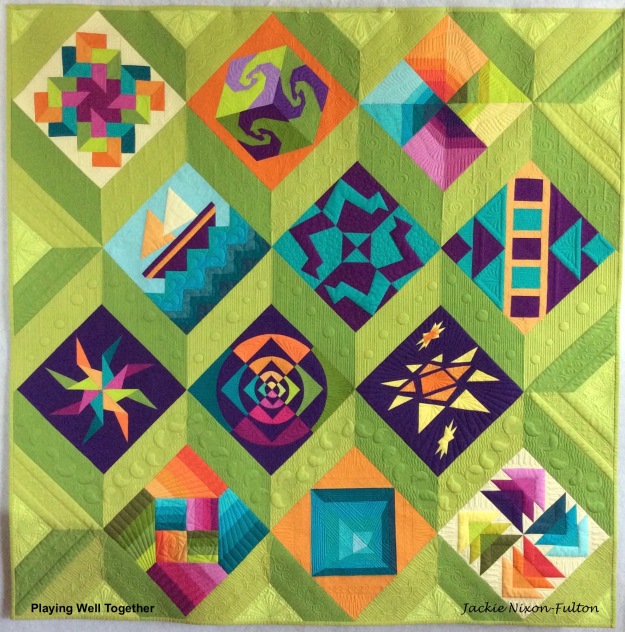
By the way, this block did win the block challenge!

So Glad to be Home!

0

I’m finally home from Florida and all of the horses arrived safe and sound.  I have been crazy busy with all the catching up yard work to do and cleaning and organizing the barn.  I finally spent a couple of afternoons and evenings working on this month’s block challenge.  The block this month was our choice of the classic “sailboat” or “airplane”.

I played around with the airplane block on EQ7, but really didn’t like anything I came up with.  I first came up with doing 4 sailboats on the diagonal sailing around the north star and did that block, but after completion, I wasn’t satisfied with it.  What do you think?

Sailing by the north star

So back to the EQ7 drawing board!  Here are some ideas I came up with.

Thinking about the waves made me think of rough seas and then I thought about doing the waves as chevrons.  This is the block I decided to do for the Block challenge:

Sailing the Chevron Seas

I think this will go nicely with the other blocks for the ultimate quilt challenge.  Voting starts today!  Go to http://a.pgtb.me/MfCtTr/h5Cj1?w=36927840&e=123431568 .  Scroll down the page and click on the vote box of the block you like the most!


Square in a Square block challenge

0

February’s block challenge for the Modern Quilts Unlimited/Michael Miller “Everything old is new” is the classic Square in a Square block.

Image 2-11-16 at 6.35 PM

This month the challenge for me was to find the time to think about quilting.  I’m pursuing my other passion for a few months….which is training and riding my dressage horses.  I’m in not so sunny and warm Florida with my daughter, Sarah, and our horses.  Off center square in a square

Anyway, I did bring my sewing machine, my Michael Miller cotton couture fabrics, and spent a couple of days playing with my graphics program.  I came up with the off center square in a square.

But I thought that I would try to do a 3D effect and continued to tinker with the design and finally decided on 3D pyramid in a square in a square.  I transferred the design to EQ7 and designed the paper pieced block.  I think I like it!  If you like it, you can vote for my block until Feb 14th by clicking on the link:  http://a.pgtb.me/MfCtTr/h5Cj1?w=36927840&e=119505436

3D pyramid square in a square signed


My Creative Journey, Continued

2

Thanks to everyone who voted for my block, I won the latest Modern Quilts Unlimited/Michael Miller quilt block challenge with my ZigZag Bow Tie block.  More than winning the challenges, I have enjoyed how each month’s block  has “challenged” my creativity and skill set. I have taken advantage of this opportunity to push my envelope to do things out of my comfort zone, or to try new techniques. I’ve been quilting long enough now that if I think of a design, I have enough “tools in my tool box” to figure out how to execute the design. Part of this comes from knowing where to look to find out how to do things. I have taken advantage of the many on-line opportunities such as Craftsy, The Quilt Show, Quilty, or  youtube how-to videos. Many of my ideas have come from thinking about a technique that I have seen on one of these on-line venues. For instance, the first block challenge was for a flying geese block. I had been wanting to do some transparency blocks after watching Weeks Ringle’s Craftsy class. In order to achieve this, I needed to do foundation piecing.  I designed the block on EQ7, and printed out my foundation piece templates.  I learned how to do foundation piecing by taking several of the Craftsy classes. This was my first attempt at designing my own foundation pieced block and was thrilled with the result in Spinning Transparent Geese.

Spinning Transparent Geese my name

The second block was Snail’s Trail, and  I had the idea to do a 3 dimensional block after recently watching Karen Combs’ “Tumbling Blocks” Craftsy class. To design the block, I actually drew it on graph paper, then translated that to Apple’s graphic design program to make one parallelogram, and then that to EQ7 for the complete block and foundation piecing pattern. One of the things I learned from doing the prototype block, was that there is a difference in foundation papers. The Golden Threads foundation paper actually distorted in the process, and because of this my parallelograms were skewed and did not match exactly. Grrr!   So, I used Carol Doak’s paper for the next block and it worked great.  Wonky Snail’s Trail didn’t win, but it is one of my favorites and I got a lot of positive feed back on it.

Wonky Snail's trail 1100 jnf

December’s challenge, the Bow Tie block, was a simple pattern of two contrasting colors; I wanted to do something to utilize that contrast. Kathy Miller had been on The Quilt Show and demonstrated the Japanese technique called “Notan”. According to Wikipedia, “Nōtan is a Japanese design concept involving the play and placement of light and dark as they are placed next to the other in art and imagery”. I used a simple design that mirrored each other in the contrasting colors. You cannot see the “bow tie” as easily because your focus is drawn to the opposing shapes in the contrasting colors, but the base pieced block is still the bow tie. I used freezer paper to make the template for the “ZigZag”, and ironed the edges under using starch. I applied the ZigZag using machine applique with Superior’s clear MonoPoly polyester thread.   I’m happy to once again win the challenge with this block.

ZigZag Bow Tie 100 signed

So, get out there and challenge yourself!  Learn and explore new techniques and add more tools to your box!  Be Creative!

Card Trick on Steroids wins the Modern Quilts Unlimited/Michael Miller Block Challenge

0

Card Trick on steroids 800 sign

Traditional Card Trick Block

This was the 4th month of the Modern Quilts Unlimited magazine/Michael Miller fabric “What’s Old is New” block challenge.  The traditional block was “Card Trick”.  For some reason the ideas were just not coming, plus there was The International Quilt Festival to go to, and a dressage clinic to organize and ride in.   Finally, the week it was due, I worked on several possibilities on EQ7 and had 4 card trick “blocks” encircling the block.  My daughter, Sarah, suggested to tuck them all together.  I thought, “well that’s not going to be easy”.  So I printed out my original version, cut them out, taped them together, and then redesigned it on EQ7, and added the 2 tone effect for each “corner”.  I had to fiddle with the layout  to get the paper piecing groupings to work  out, but even with that I had four set-in seams (Thank you, Gyleen Fitzgerald for your technique for doing set-in seams!  If you don’t know it, you can watch it on THE Quilt Show).   I had to hand applique the final  middle square onto the top to finish it off. (I am redesigning it to eliminate the set-in seams and the hand appliqued middle square).   I was really pleased with how it turned out.  Next was naming it.  Jerry and Sarah didn’t like any of the names I came up with.  Thought about it for 2 days and on the day it  was due,  I showed it to Jerry again and said “What about 4 of a kind?”  And he said, “I don’t see 4 of a kind”.  He pointed out that two of the small corner blocks were reversed in color.  So instead of an orange on the very tip, I had a teal.  I couldn’t believe that I had looked at this block for days, and didn’t see it!  Neither did Sarah.  So, I tramped up the stairs, ripped that part out, and redid that section…just in time to submit it!  After all that, I finally decided on “Card Trick on Steroids” but wish now I had just named it “Texas Card Trick” since I’m a Texan and everything is bigger here!